How to Change Your Name and Username on Facebook
Are you tired of your old Facebook name and want to change it? Or are you looking to set up or revamp your Facebook Page? Whatever the reason, changing names and usernames on Facebook is relatively easy and hassle-free. In this article, we will guide you on how to change your name and username on Facebook.
In a step-by-step format, we will explain the steps involved in changing your or your business page name and username. Before we begin, it is pretty important to know the standards and requirements of Facebook for changing or setting up a username. Let’s walk you through those first.
What Are the Facebook Username Requirements
Facebook lets you create personal accounts and business pages to connect and expand your network beyond boundaries. However, before changing the name or username, it is essential to understand the requirements Facebook has. Let’s begin with the personal profiles.
For Personal Profiles
Facebook has a strict naming policy for personal profiles. When creating a personal account, it is vital to use the name you go by, which can be your nickname, professional name, or maiden name.
There are certain things that your Facebook username cannot have, such as symbols, numbers, strange capitalizations, repeated characters, punctuation, characters from multiple languages, words or phrases, or (most importantly) the name of another person.
For Business/Brand Pages
In the case of business/brand Pages, the page’s admin can change its username to something unique and at least five characters in length. The username can only have numbers, letters, and period punctuation, and most importantly, it must follow Facebook’s terms of service.

That said, it is inherent to know the difference between changing a name and a username. In a broad sense, the name you use to create your account or business/brand page represents your or your brand’s identity on Facebook. So changing your name means altering your identity.
While on the flip side, changing your username only affects the web address of your Facebook profile or page, making it easier to find or share with others. With this understanding, let’s get into changing Facebook names.
How to Change Your Name on Facebook
Whether you’re looking to edit your first name, last name, or even your nickname, Facebook provides a straightforward process for making these updates. However, it is significant to note that you can only change your Facebook name every 60 days. Follow the steps below.
On Desktop
Step 1: Open Facebook on your preferred browser and log in with your credentials.

Step 2: Click on your profile picture in the top right corner.
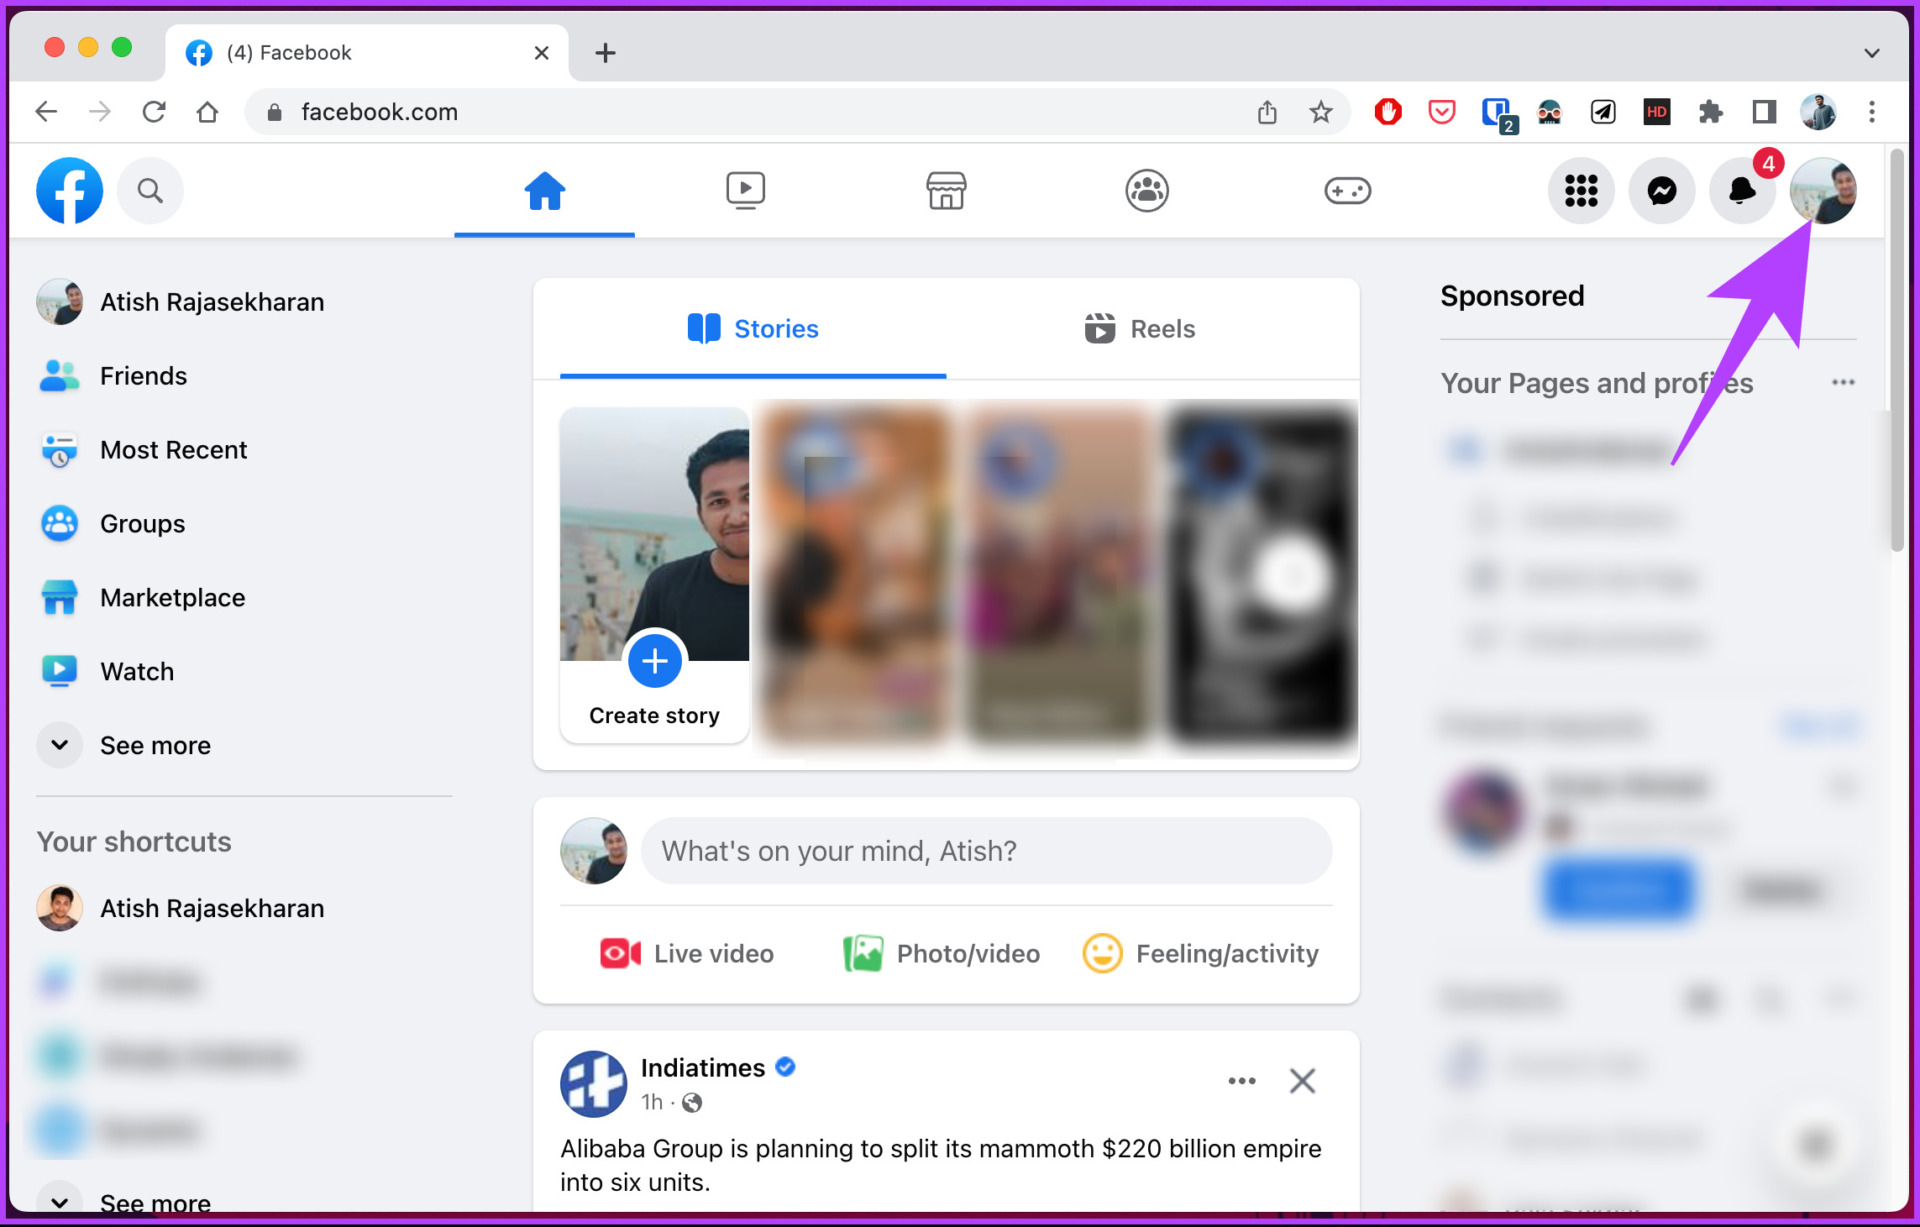
Step 3: Select Settings & Privacy from the drop-down menu.

Step 4: Select Settings.

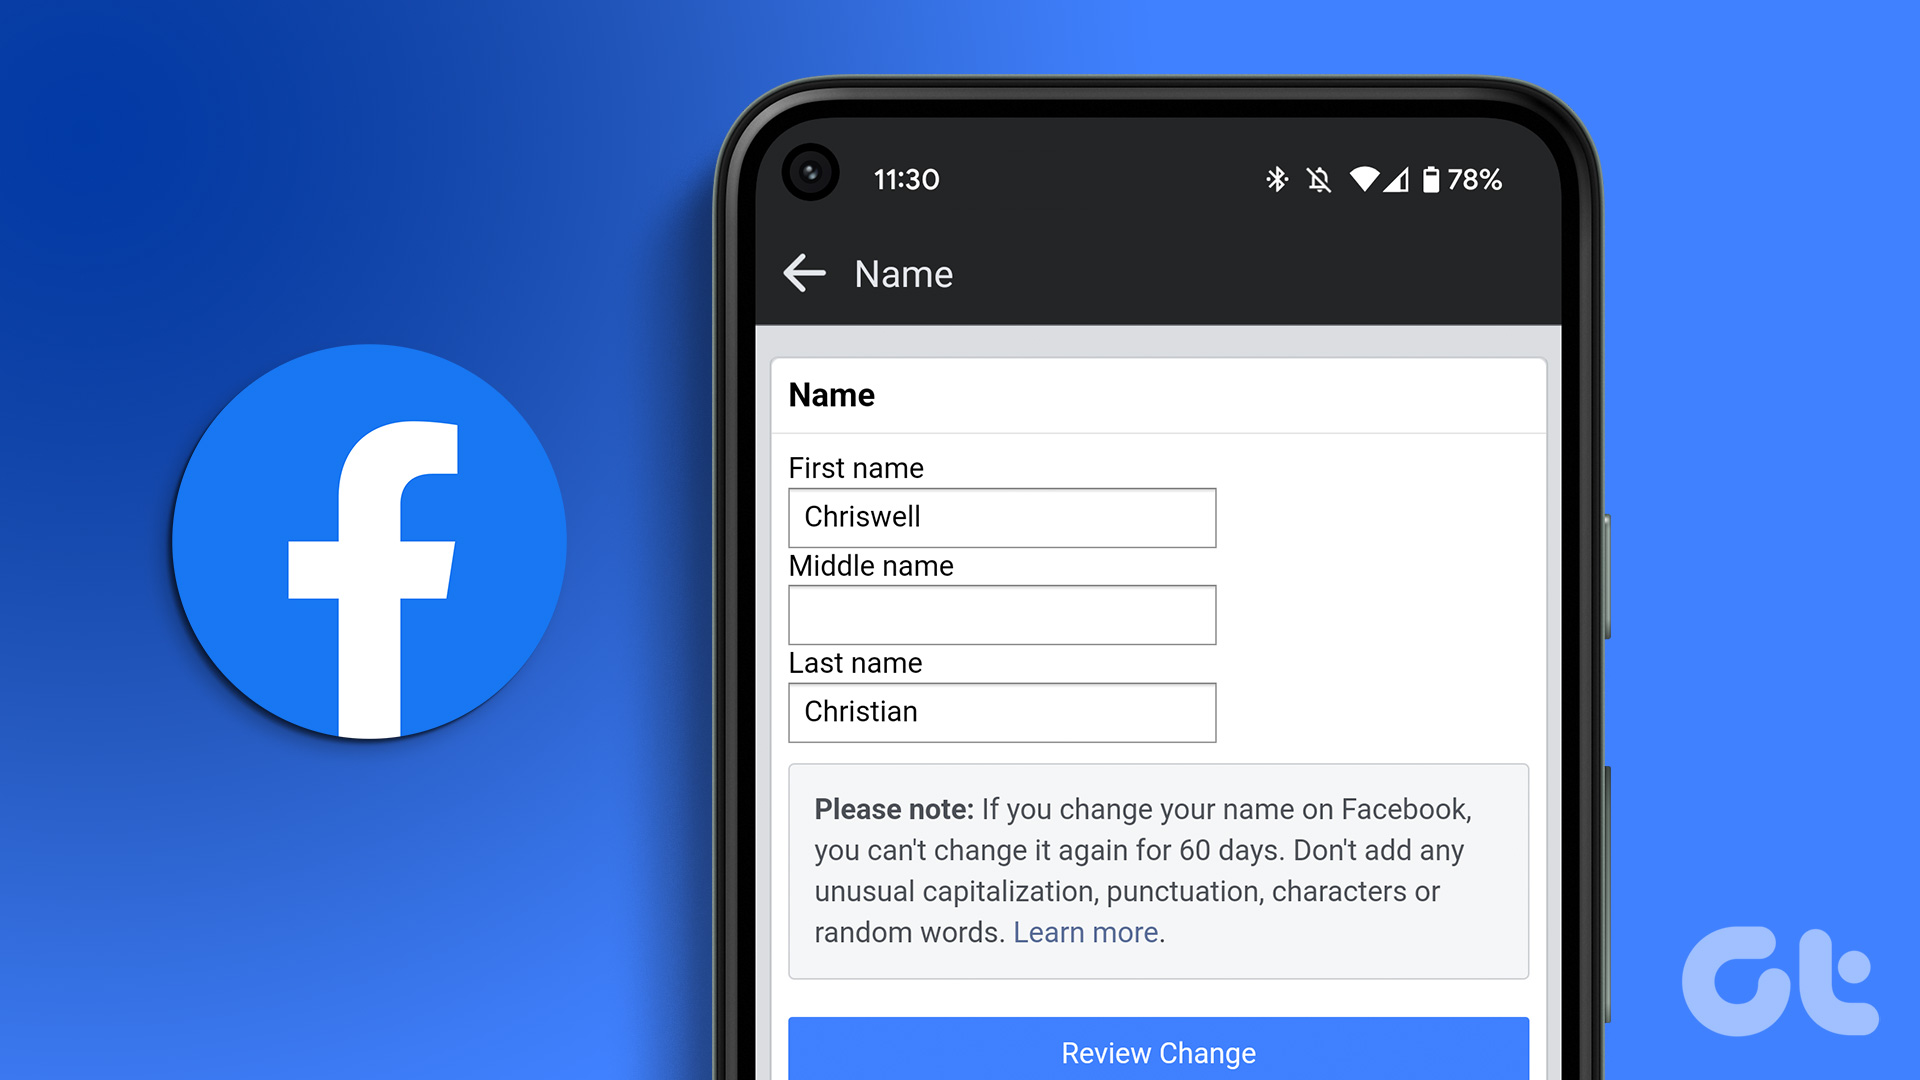
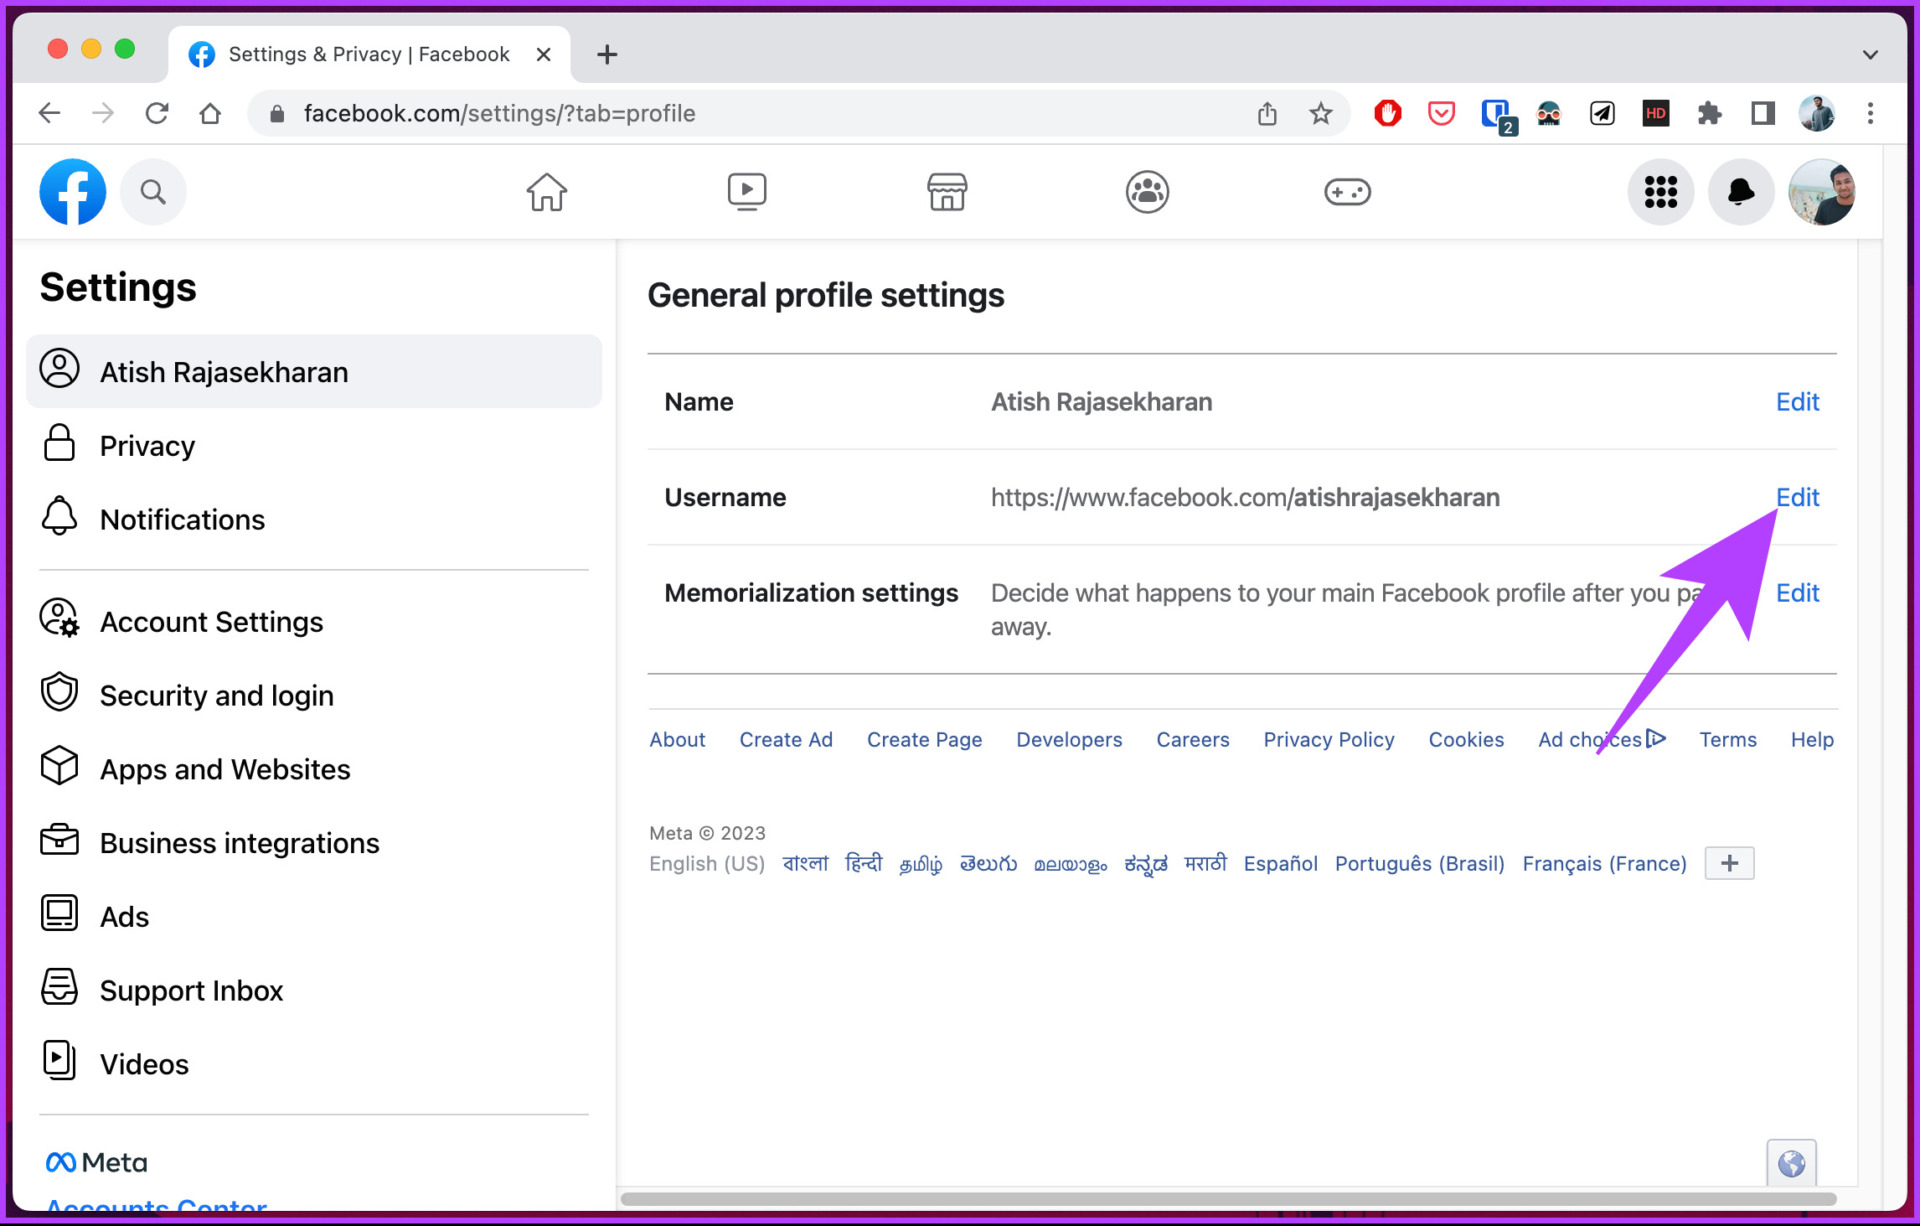
Step 5: Under ‘General profile settings,’ click Edit next to the Name.

Step 6: Type your name or make necessary changes to your Facebook name and click Review Change.

Step 7: Finally, enter your password in the text field and select Save changes.

That’s it. Once reviewed, your Facebook display name gets changed, and your new or modified name will appear everywhere. The change may sometimes take time to effect; so be patient.
Tip: Also learn how to find saved and liked Reels on Facebook.
On Phone
Changing Facebook names using the Facebook mobile app is easy. In fact, the steps are the same for Android or iOS devices. However, depending on your demographics, the options may change. Follow the below-mentioned steps.
Step 1: Launch the Facebook app on your Android or iOS device.

Step 2: Tap on the three horizontal lines icon at the top.
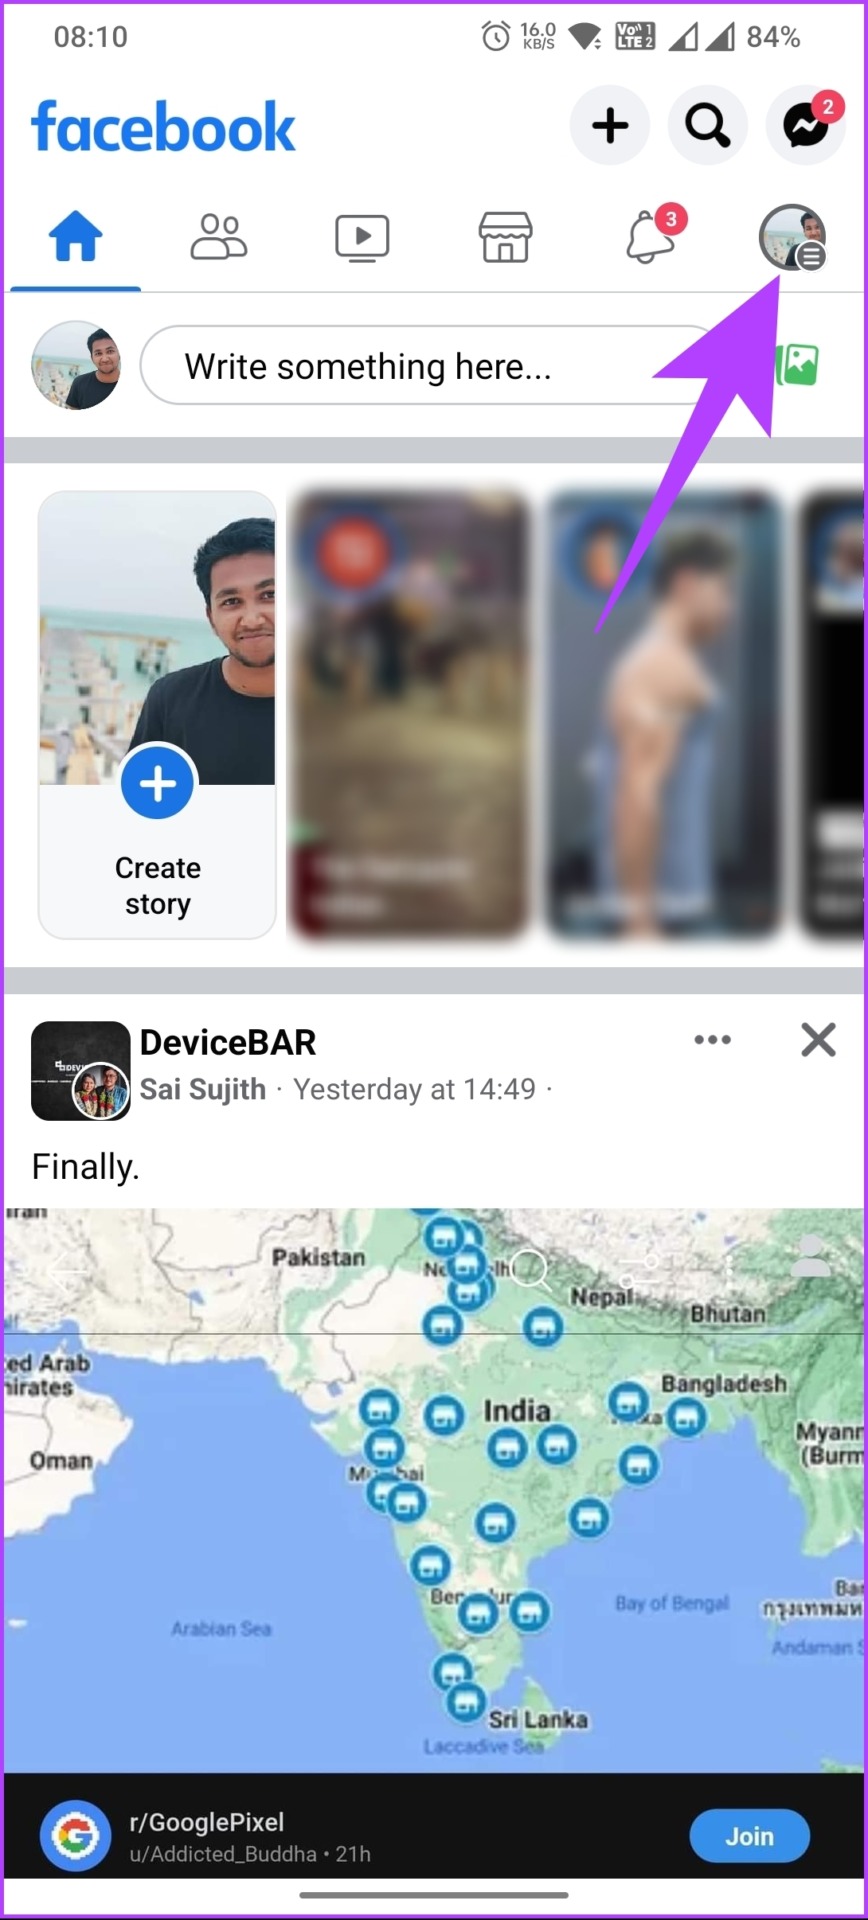
Step 3: In the Menu screen, scroll to the bottom and select Settings & privacy.
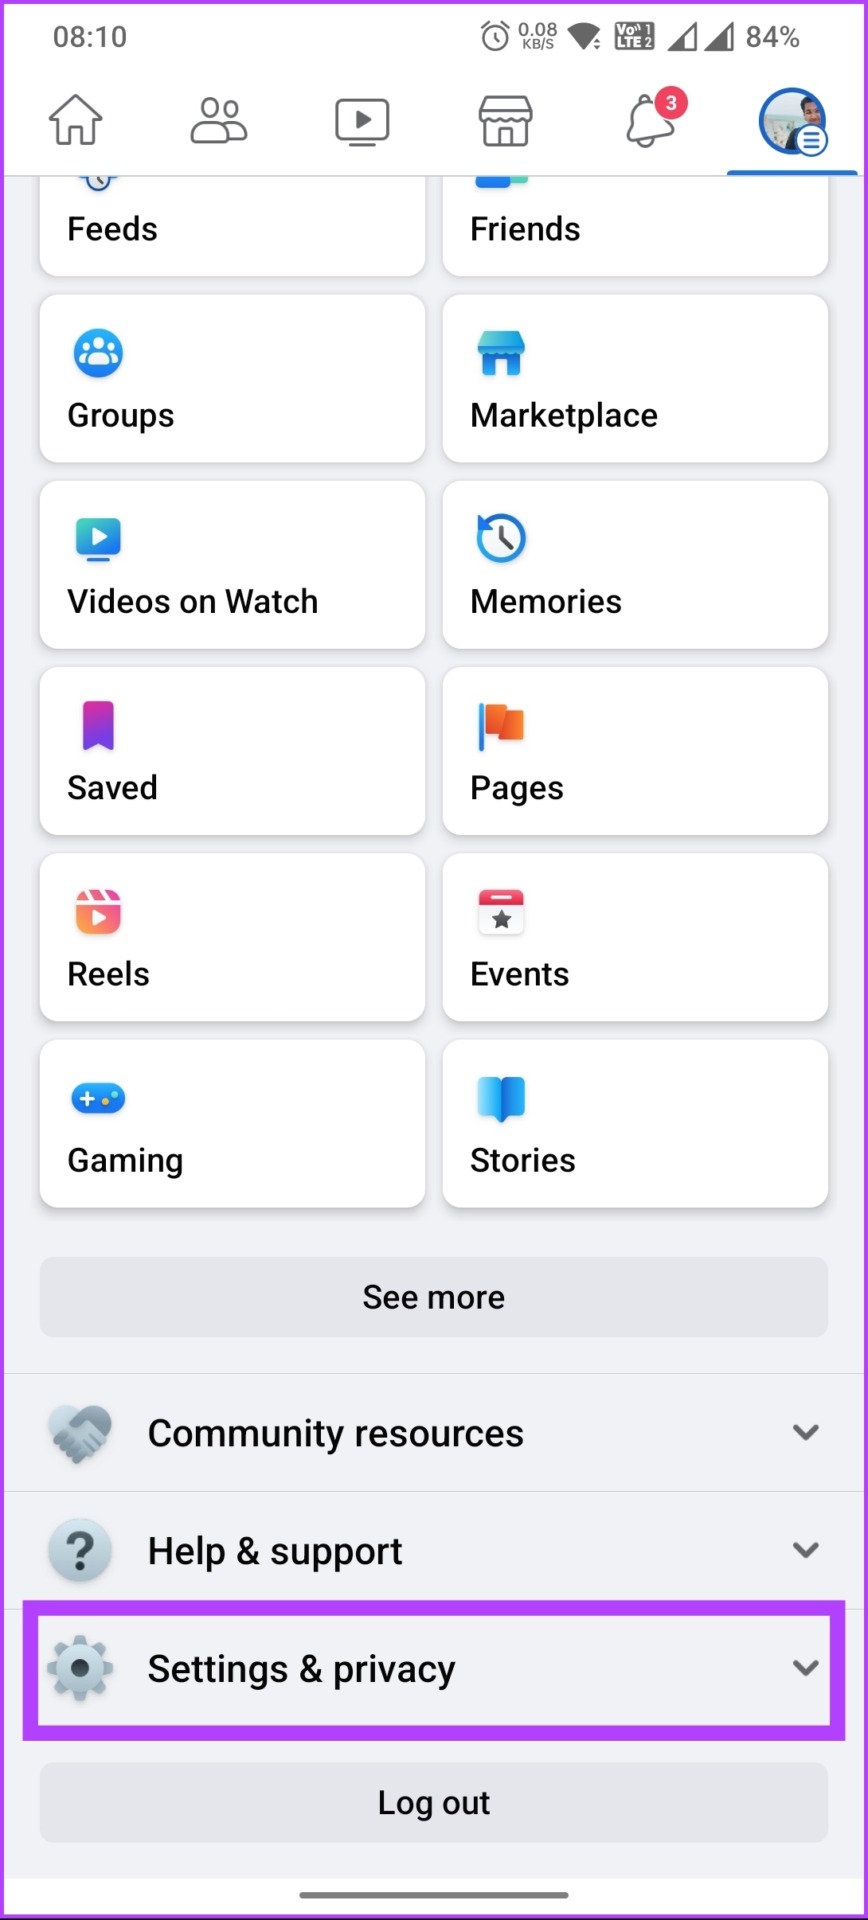
Step 4: From the drop-down menu, select Settings.
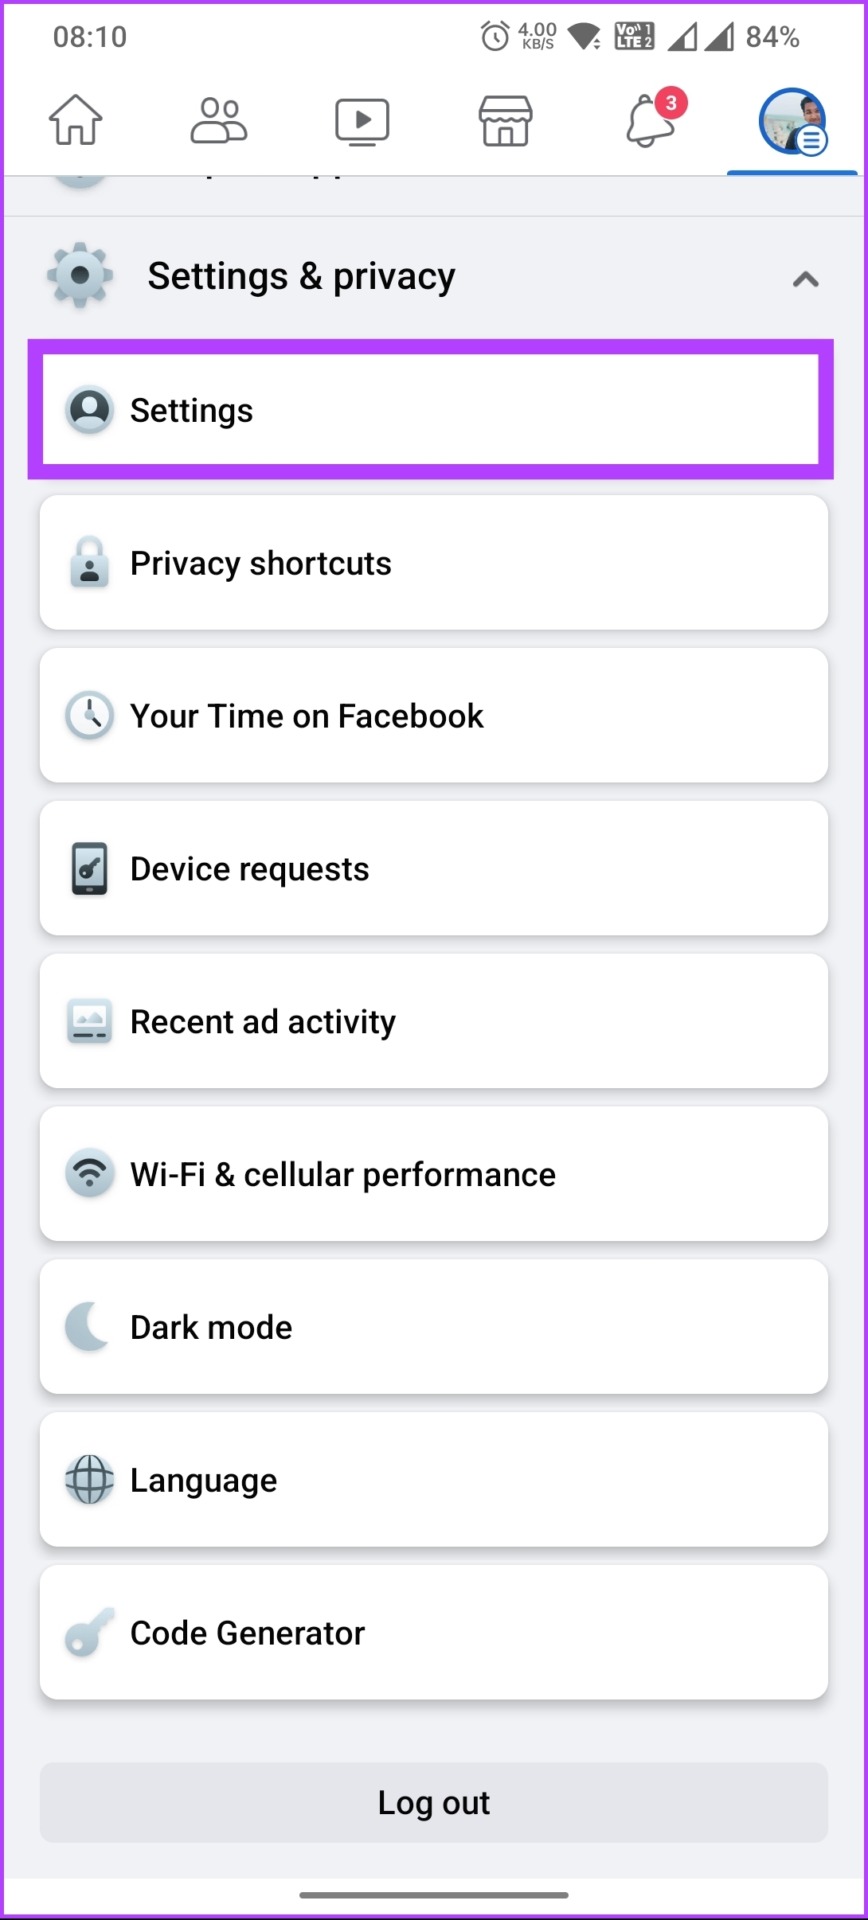
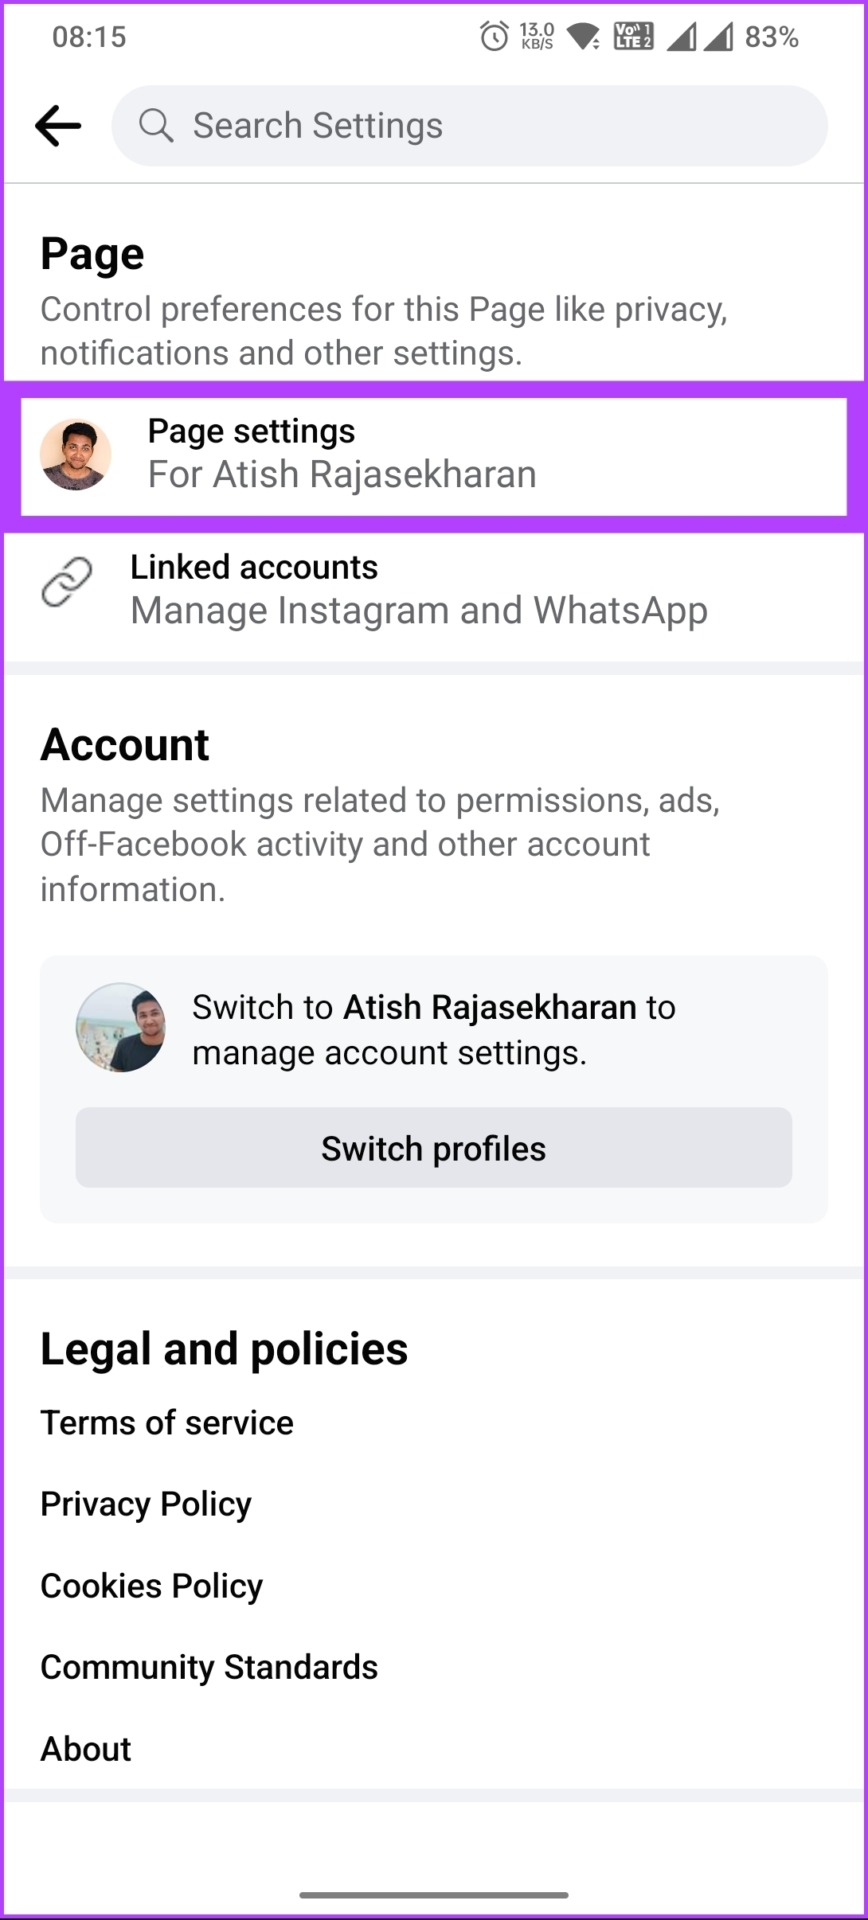
Step 5: On the new screen, under Account, tap on Personal information followed by Name.

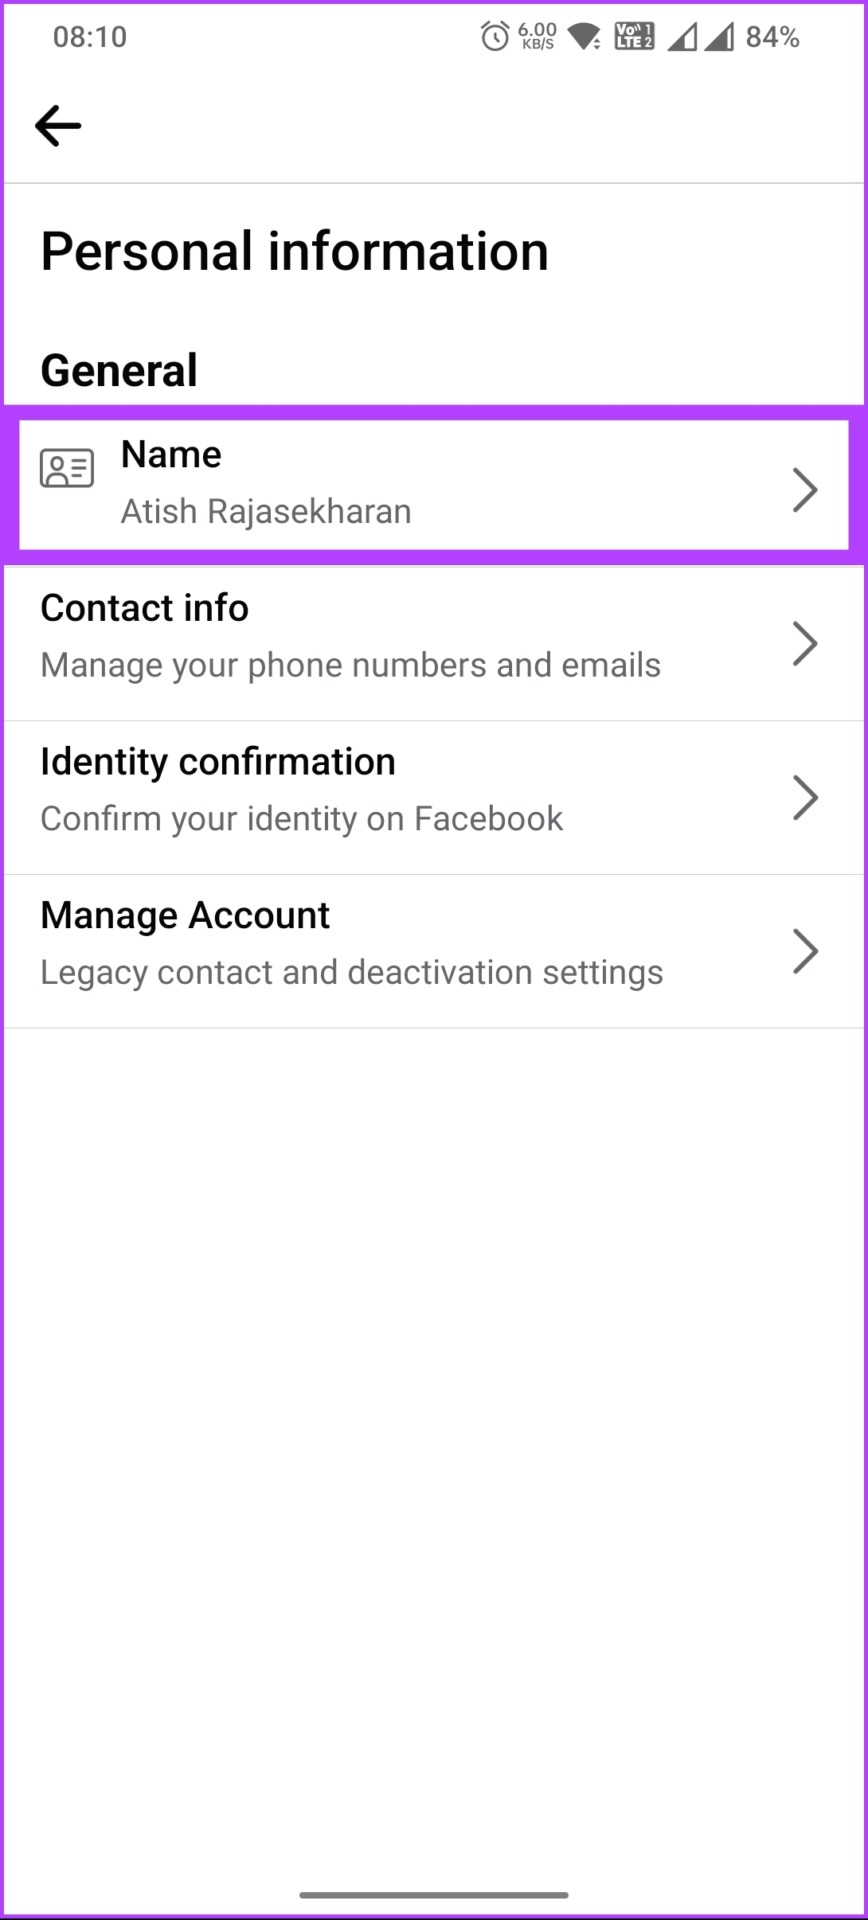
Step 6: Now, type or modify your name and select Review Change.
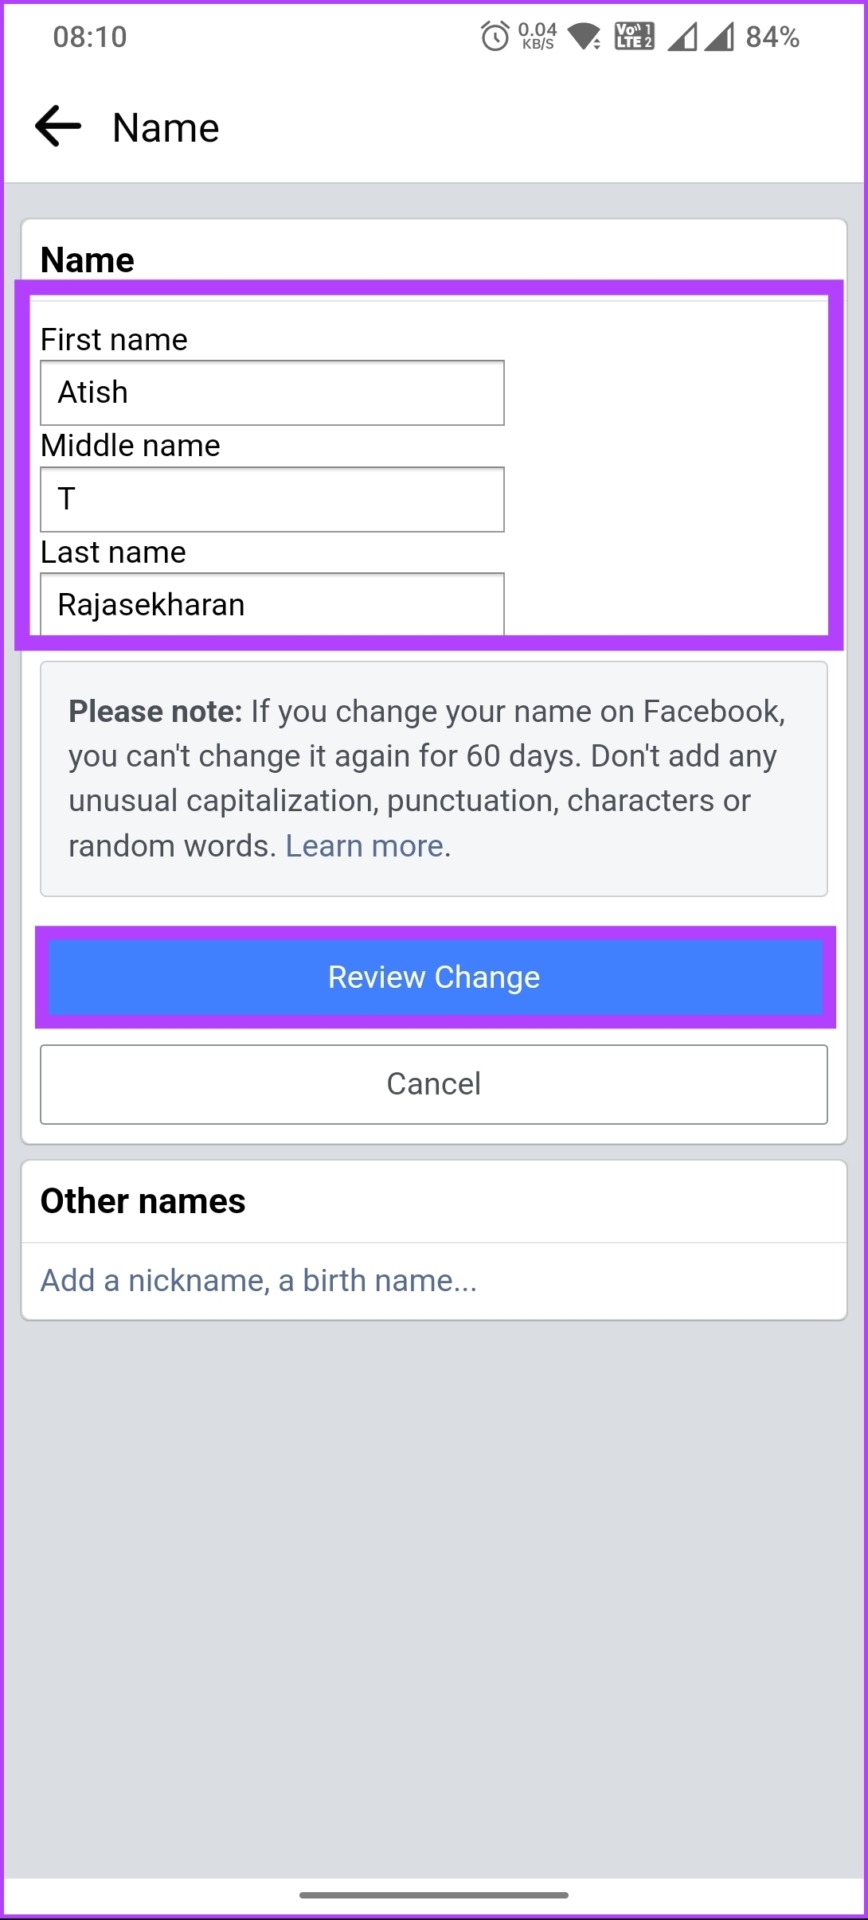
Step 7: Choose the way you want your name to appear, enter your password, and tap Save Changes.

There you go. You have changed your Facebook name successfully and with ease. Once it gets reviewed and approved, you will see the change across all the devices. If it is not your profile name but the name of your Facebook Page, continue reading.
Also read: How to link Instagram to Facebook page and profile
How to Edit Your Facebook Page’s Name
Not just the personal account’s display name, Facebook also lets you change your business page name. And no, don’t get twisted; changing the page name doesn’t affect its username.
That said, before you go ahead and change your page name, ensure that the name you are opting to go with accurately reflects the page’s theme and doesn’t break Facebook page name standards. Once your requested name change is approved, you cannot change it again for 7 days, and you won’t be able to unpublish the page during that time.
On Desktop
Step 1: Open Facebook in your preferred browser and log in with your credentials.
Step 2: Click on your profile picture in the top right corner.
Step 3: From the drop-down menu, click on See all profiles.

Step 4: Now, select the page you want to change the name of.
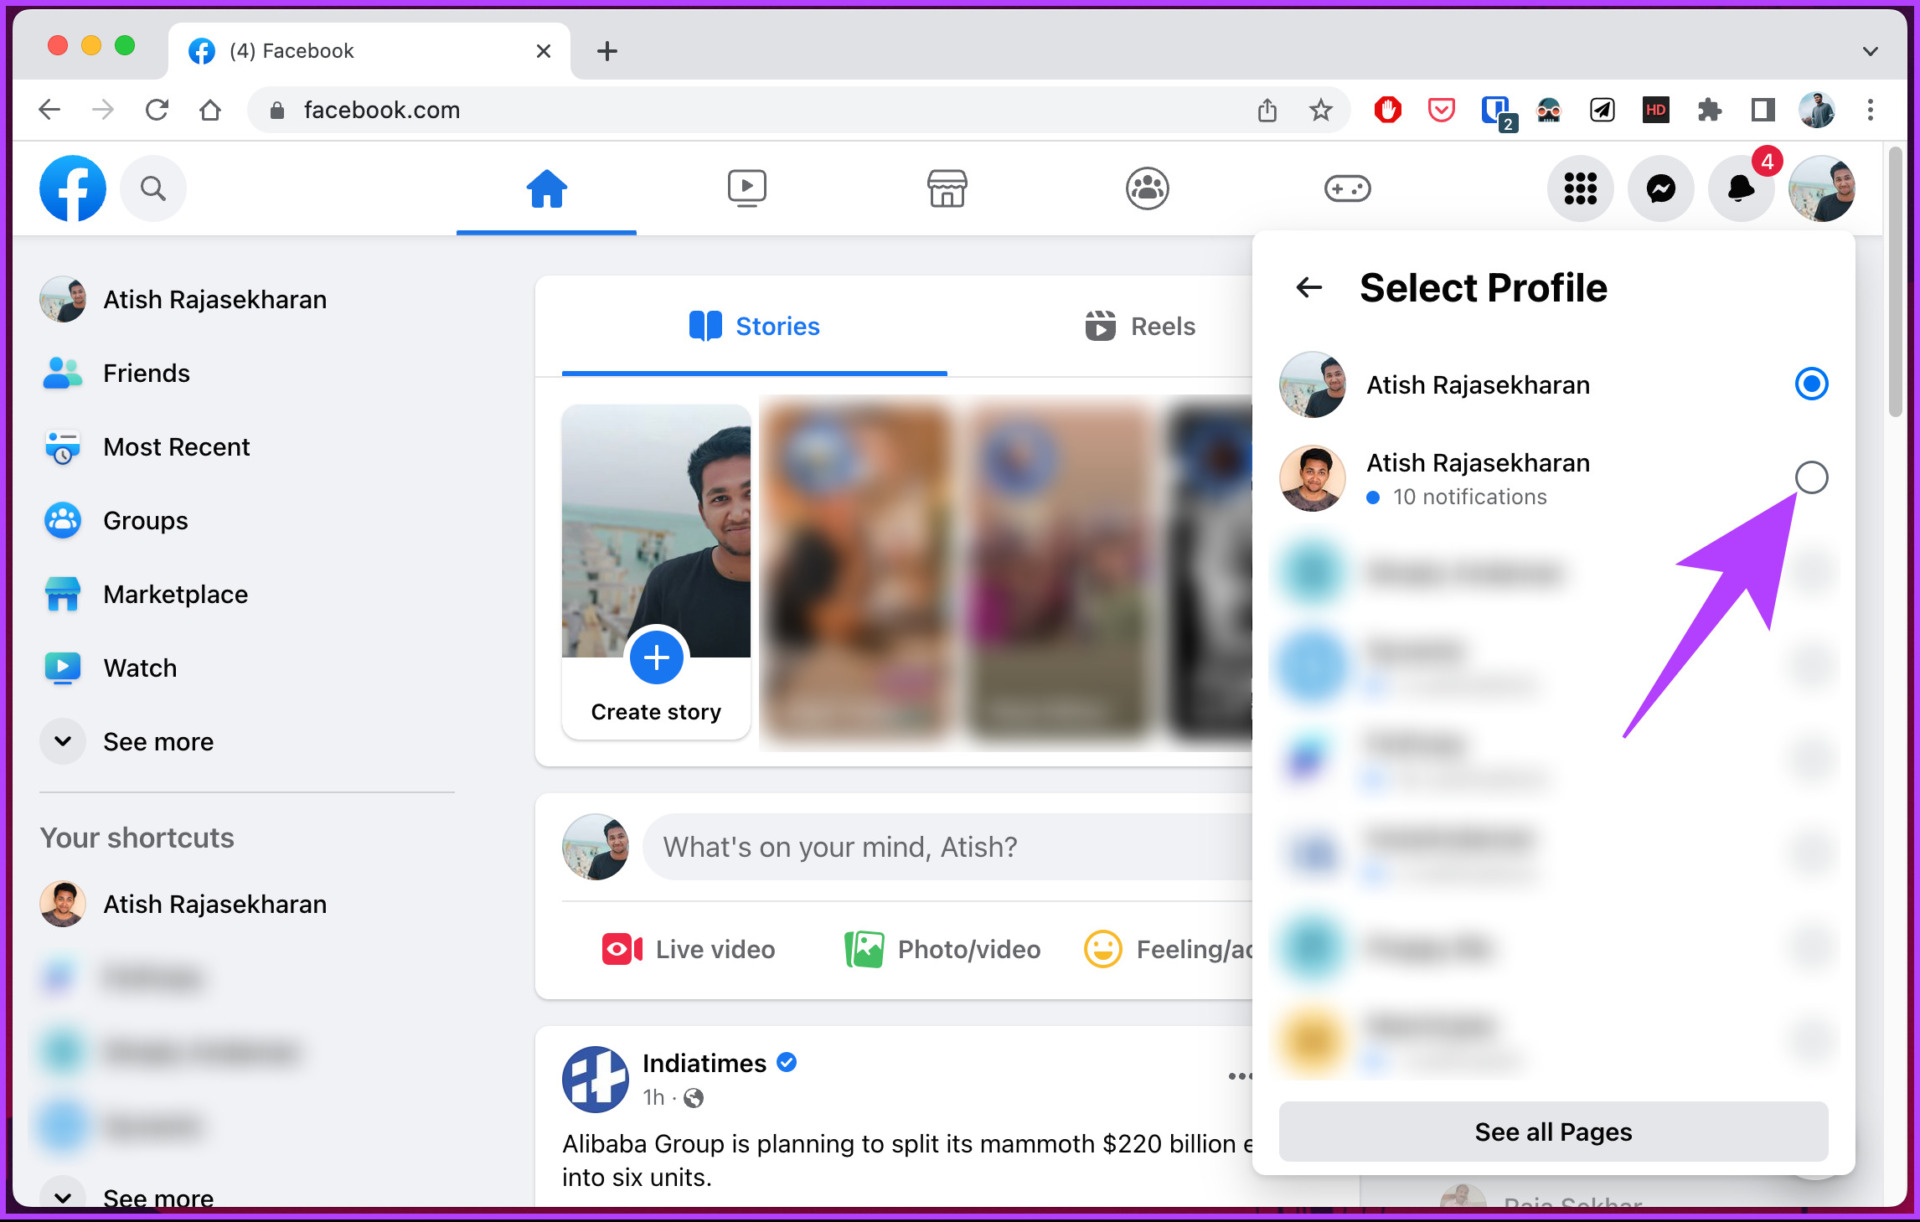
You will see a screen that says, ‘Switching to [Facebook Name].’ Once switched, follow the below steps.
Step 5: Click on your profile picture in the top right corner.
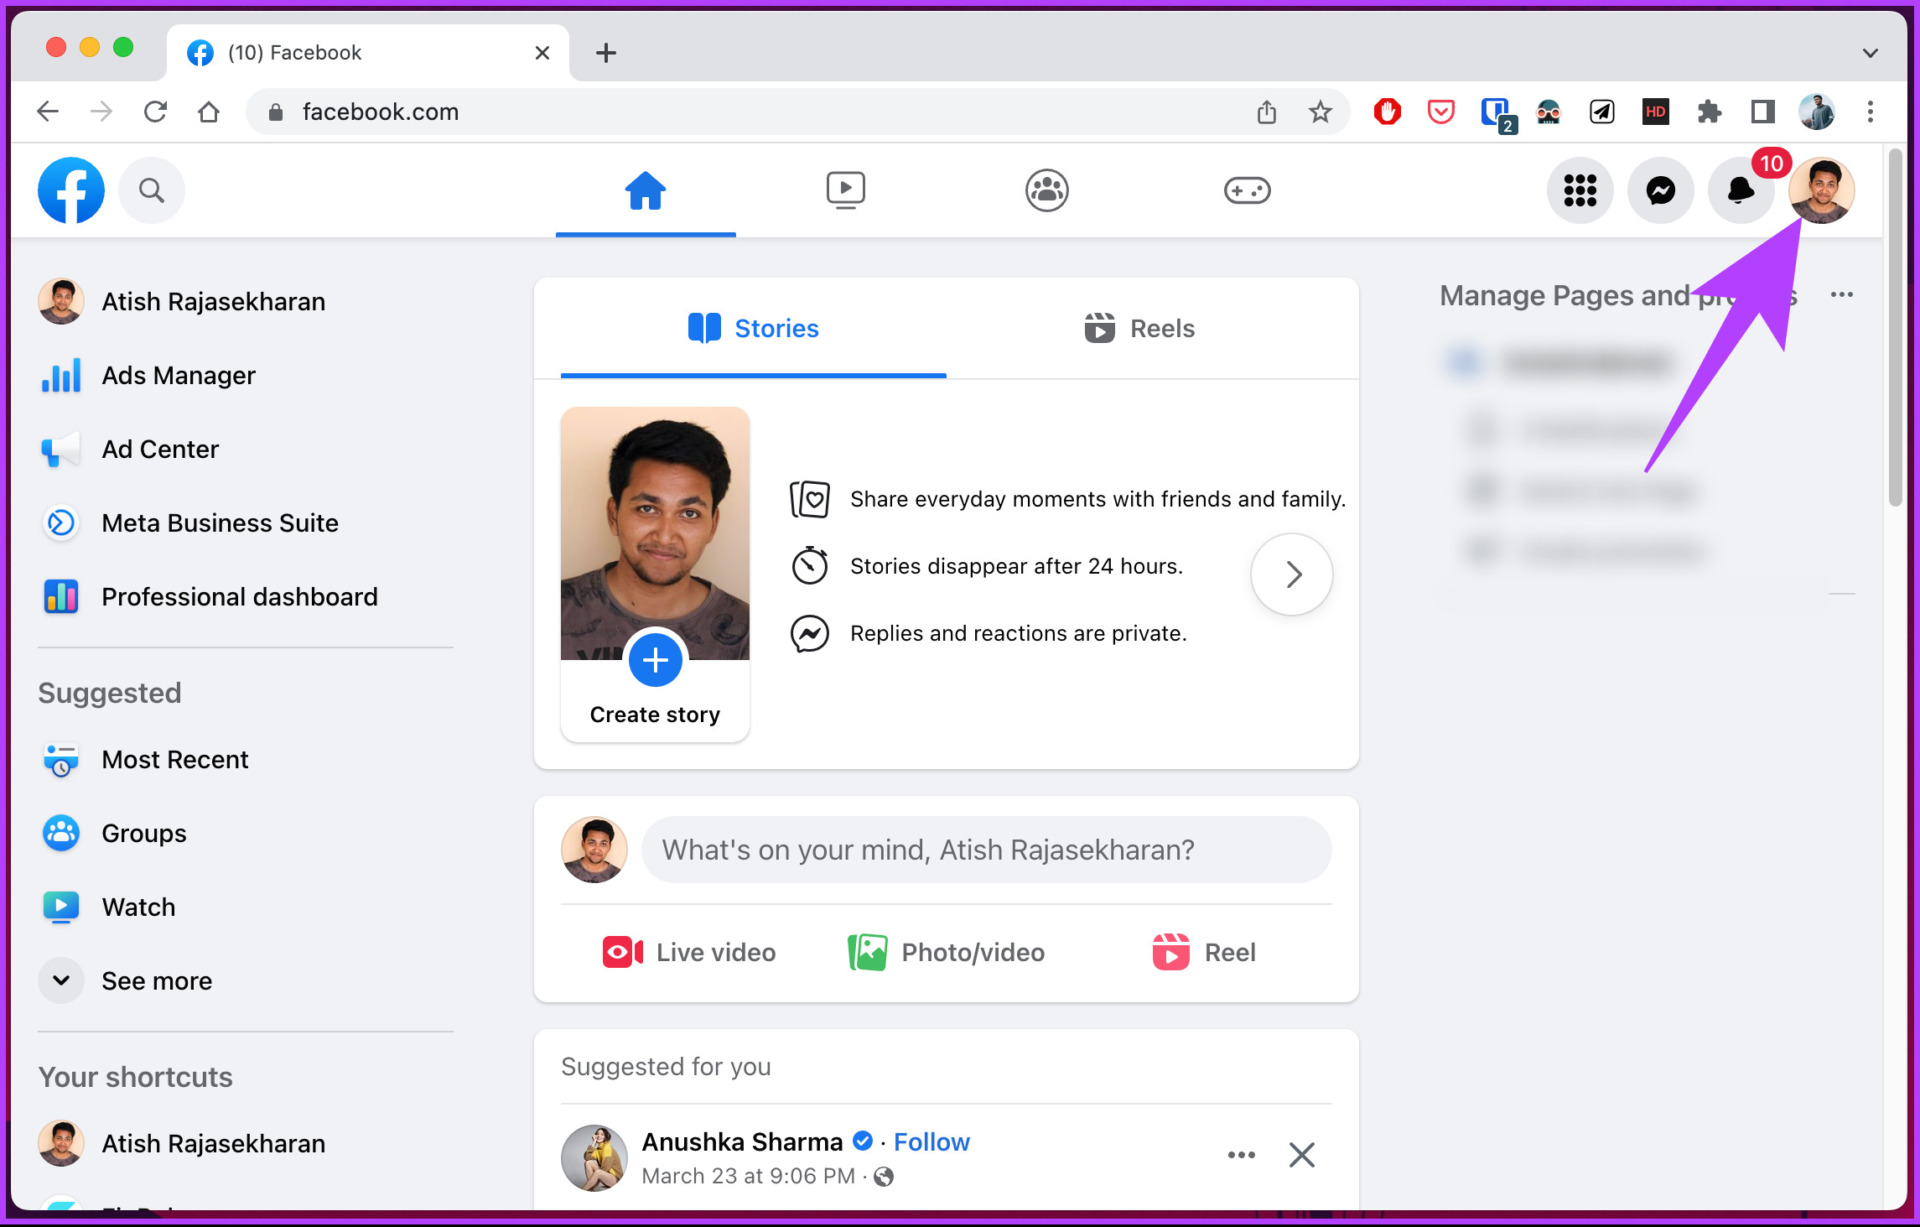
Step 6: Select Settings & Privacy from the drop-down menu.

Step 7: Select Settings.

Step 8: Under General profile settings, click Edit next to the Name.

Step 9: Type your name or make necessary changes to your Facebook name, and click Review Change.
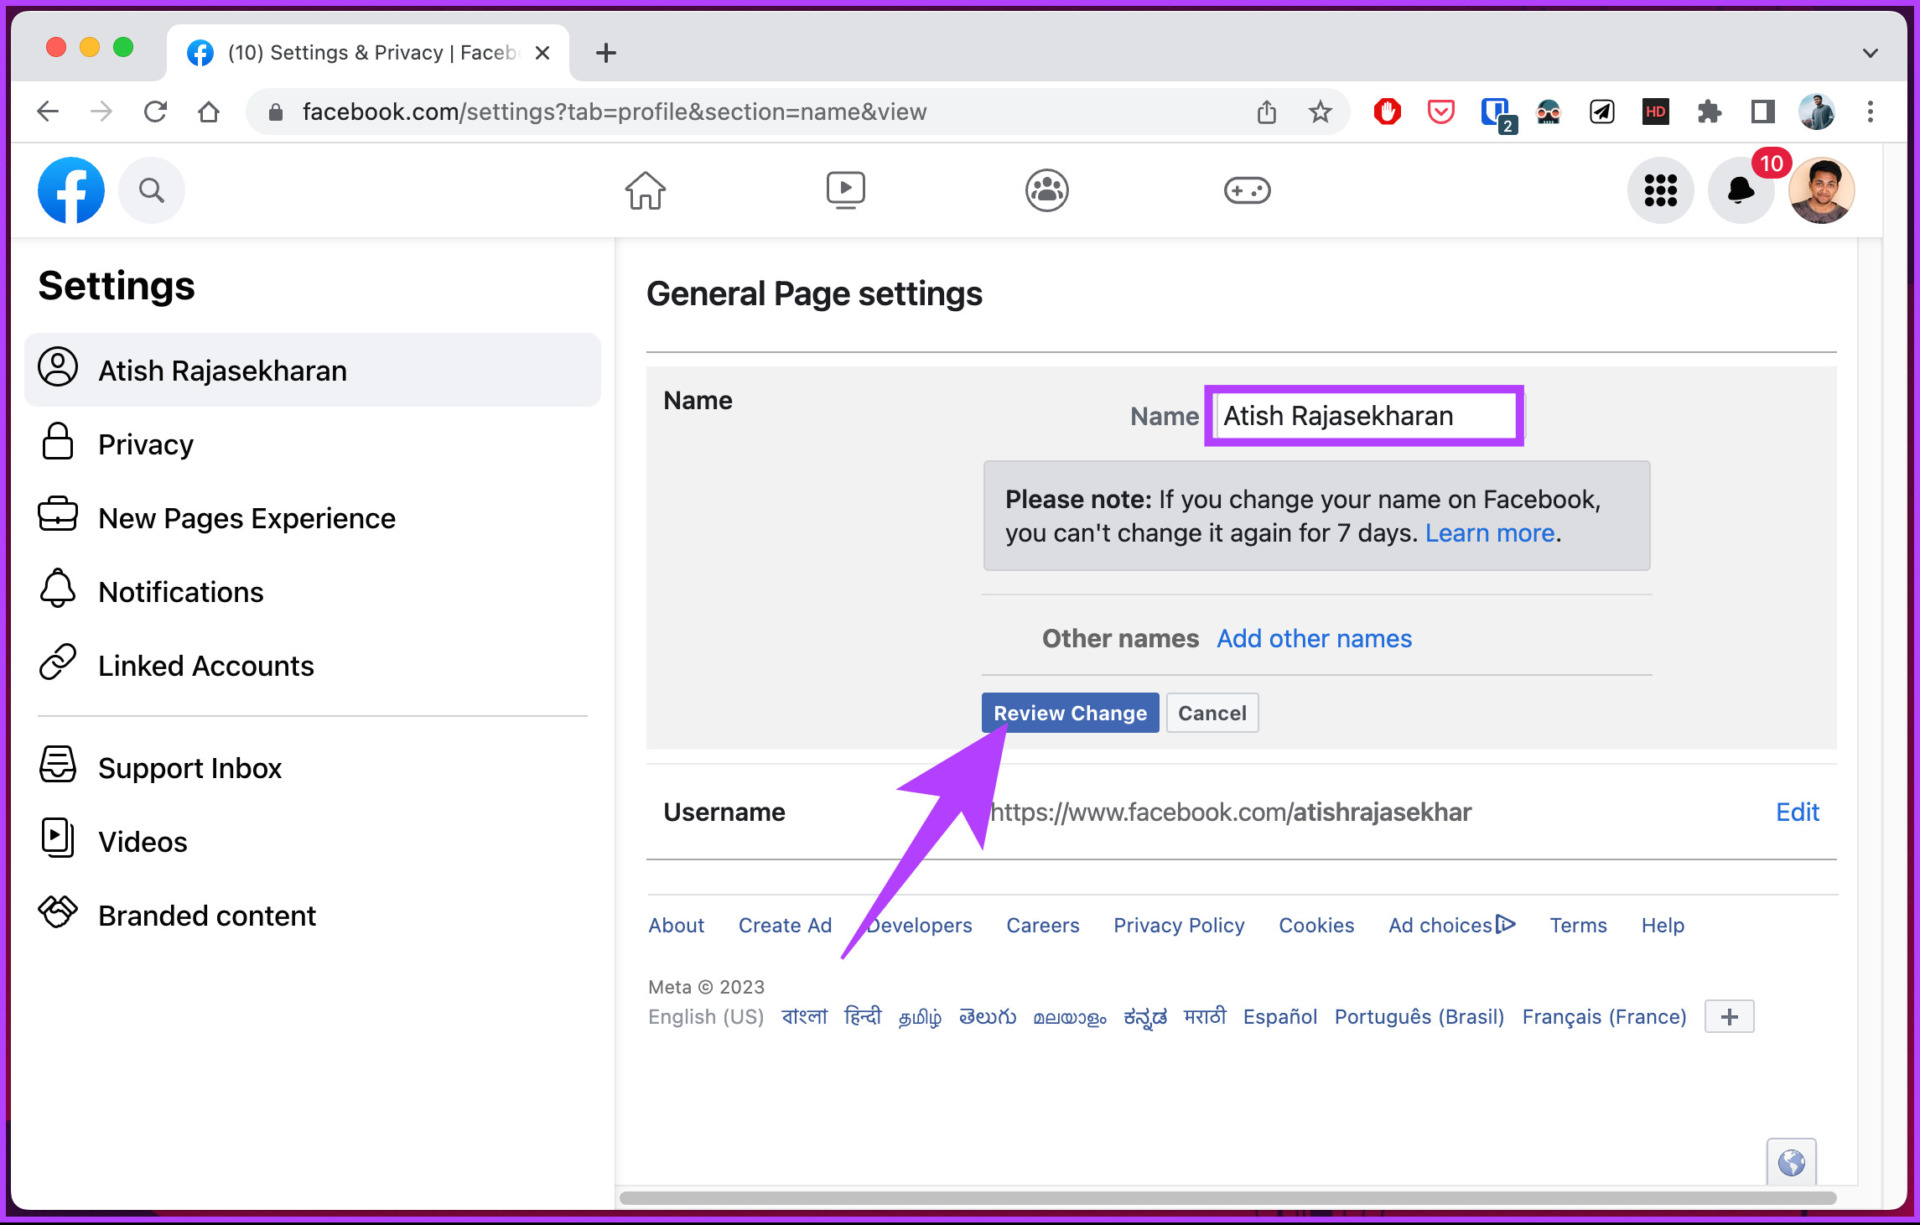
Step 10: Finally, enter your password in the text field and select Request Change.

On Facebook Mobile App
Facebook lets you change your page name on mobile devices, and the steps are the same for Android or iOS devices. However, it is important to note that the button placement or options may change depending on the demographics you are in. Follow the below-mentioned steps.
Step 1: Launch the Facebook app.
Step 2: Tap on the three horizontal lines icon at the top.
Step 3: In the Menu screen, tap on the displayed profiles next to your profile name and, from the bottom sheet, choose the page you want to change the display name.


You will see a screen that says, ‘Switching to [Facebook Name].’ Once switched, follow the below steps.
Step 4: Tap on the three horizontal lines icon at the top.

Step 5: In the Menu screen, scroll to the bottom and select Settings & privacy.

Step 6: From the drop-down menu, select Settings.
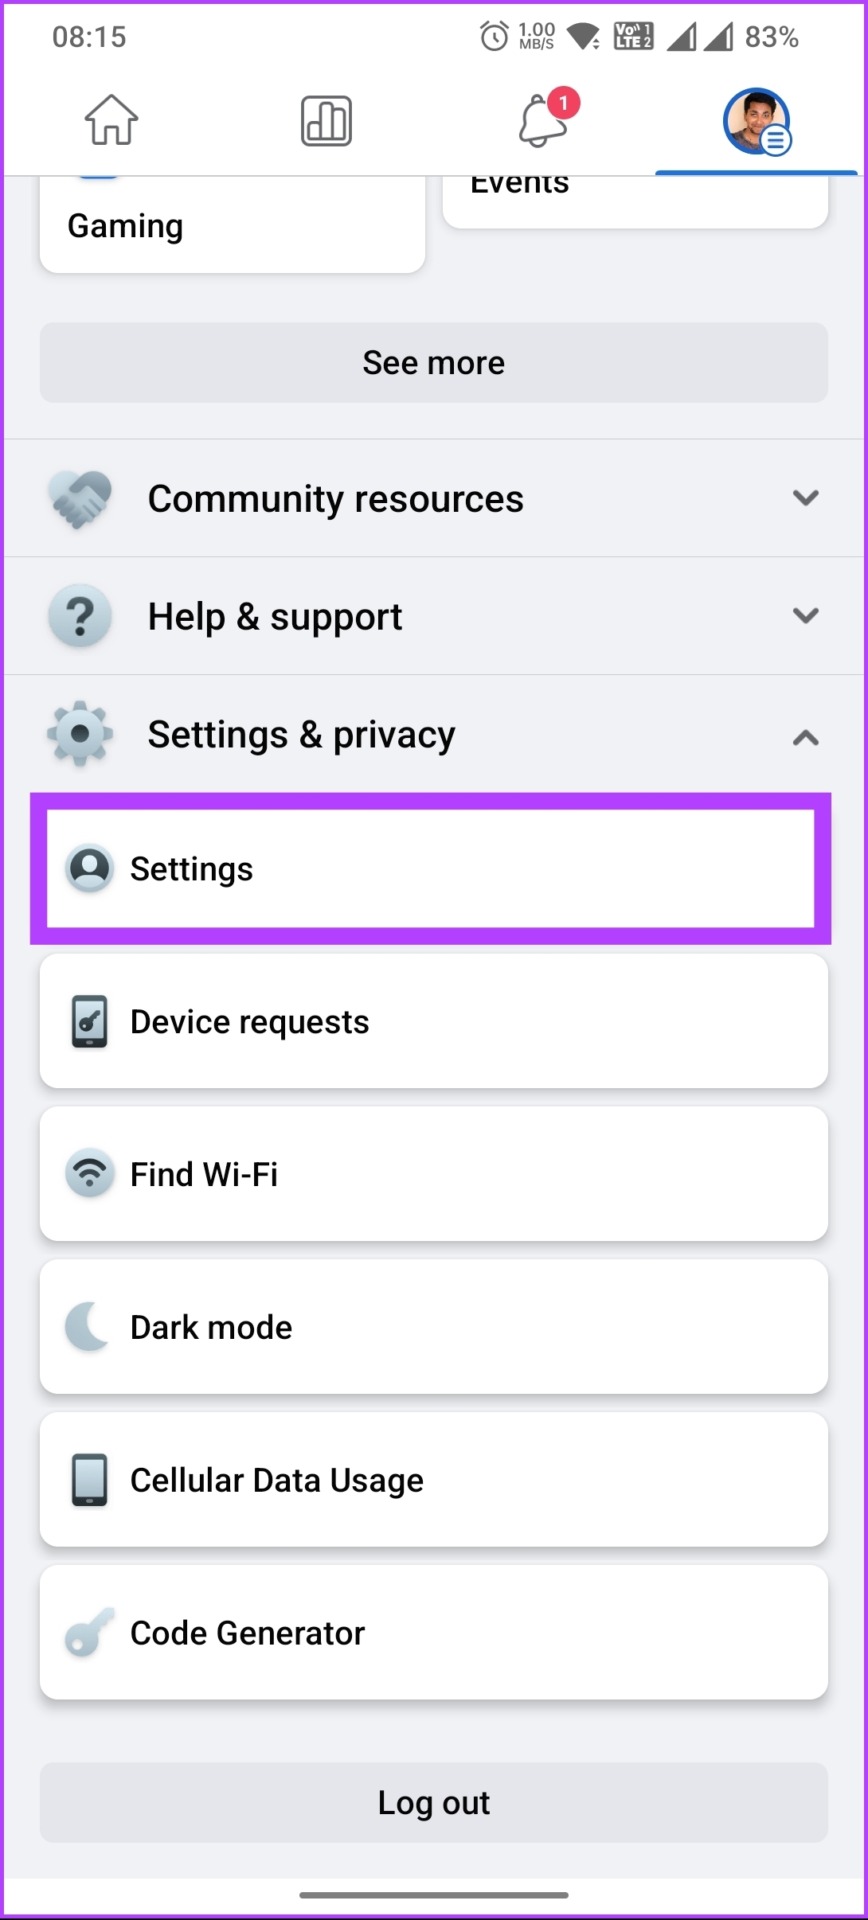
Step 7: On the new screen, tap on Page settings followed by Name.

Step 8: Now, type or modify your name and select Review Change.

Step 9: Finally, enter your password and tap Save changes.

There you go. Once the name gets approved by the Facebook team, the changes will take effect. Now that you know how to change your Facebook account or page name, let’s go ahead and change usernames.
How to Change Facebook Username for a Personal Account
Facebook lets you set your username, however, only once. And, unlike changing names, you cannot change your Facebook username from the Facebook mobile app. So, if you are new or haven’t set up your username yet, follow the below instructions.
Note: Facebook may not allow you to create or set a username for a new Page if you have recently created several new pages.
Step 1: Open Facebook in your preferred browser and log in with your credentials.
Step 2: Click on your profile picture in the top right corner.
Step 3: Select Settings & Privacy from the drop-down menu.
Step 4: Select Settings.
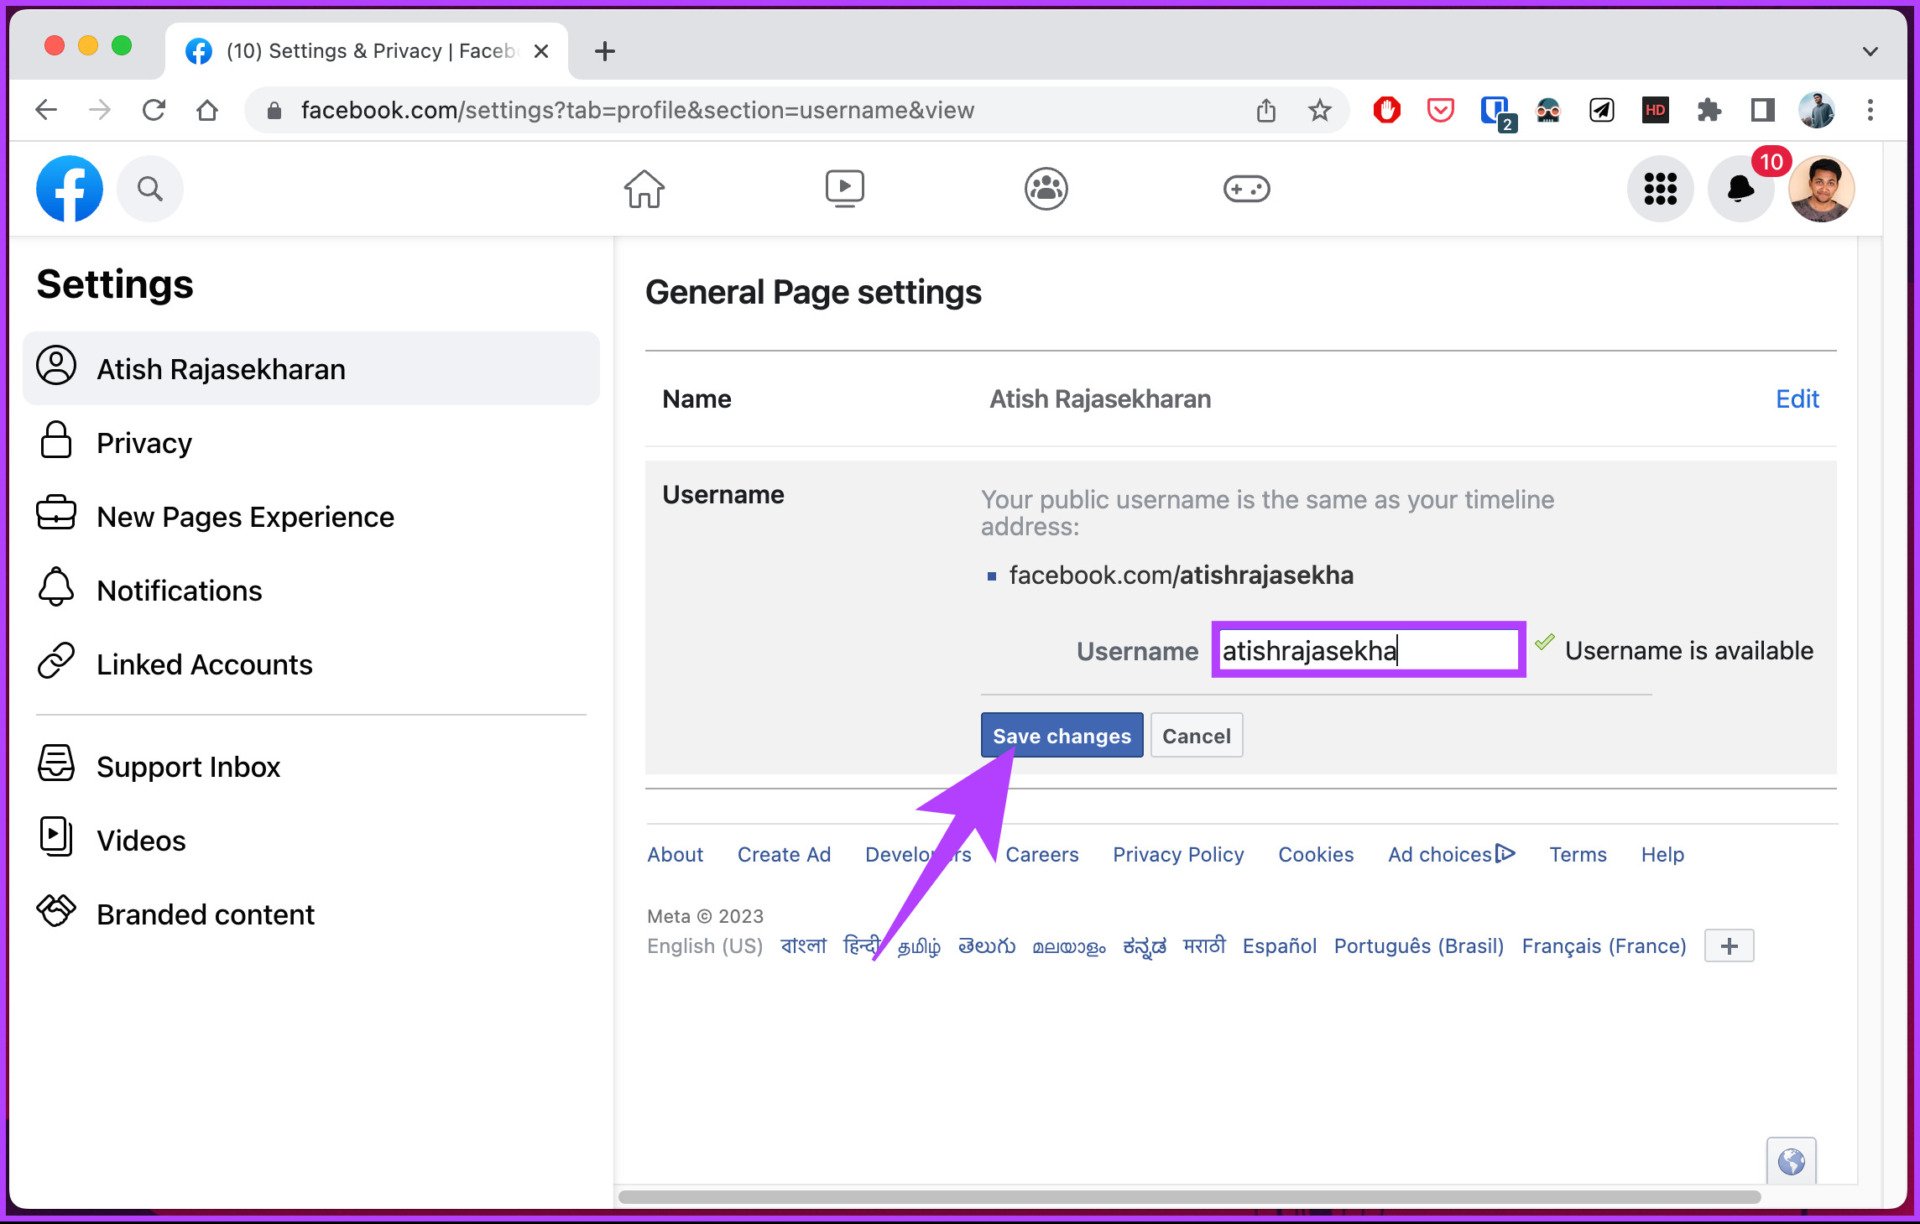
Step 5: Under General profile settings, click Edit next to the Username.

Step 6: Enter your preferred username, and if it says ‘Username is available,’ click on Save changes.
Note: If it says ‘Username is not available,’ you must change or tweak your username and check again. There’s no way to bypass this mandatory barrier.
That’s it. From now on, your account will be identified by this unique username. Now, if you want to change your Facebook page’s username, move on to the next method.
How to Change Facebook Username for a Business Account
Changing your Facebook username for a business account is no different than changing your personal profile’s username. Follow the below-mentioned instructions.
Step 1: Open Facebook in your preferred browser and log in with your credentials.
Step 2: Click on your profile picture in the top right corner.
Step 3: From the drop-down menu, click on See all profiles.
Step 4: Select the page you want to change the name of.
You will see a screen that says, ‘Switching to [Facebook Name].’ Once switched, follow the below steps.
Step 5: Click on your profile picture in the top right corner.
Step 6: Select Settings & Privacy from the drop-down menu.
Step 7: Select Settings.
Step 8: Under General profile settings, click Edit next to the Username.
Step 9: Enter your preferred username, and if it says ‘Username is available,’ click on Save changes.
Note: If it says ‘Username is not available,’ change or tweak your username and check again. There’s no way to bypass this error.

There you have it. Your Facebook Page’s username has been changed. If you have any queries we missed addressing, check out the next section.
FAQs on Changing Your Facebook Username
One of the most common reasons why you can’t change your Facebook name is that Facebook allows you to change your username only once every 60 days. So, if you’ve already changed your username within this timeframe, you’ll have to wait out that period.
In addition, if your desired name violates Facebook’s guidelines, you can’t use the new name.
If you’ve previously set a username for your Facebook account, unfortunately, there’s no official way to change it. While you can try contacting Facebook support for assistance, it’s important to note that the likelihood of being able to change your username again is low.
Yes, Facebook allows multiple users to have the same name. However, each user must have a unique username, which is a personalized URL that appears in the address bar of your web browser after ‘facebook.com/’. So while two users can have the same name, they will have different usernames.
Refresh Your Facebook Account
Now that you know how to change your name and username on Facebook, you can update your profile information, make it more professional, or start over. You may also want to read how to change your username on Instagram.